
This section of my site is an archive of my previous site about building a projector. I keep getting emails asking for more information, so I made this write-up about how to build one. It should answer most of your questions.
LCDs
Most all new projectors use LCDs. Some have one, some have three, and they're easy to work with because you can find them everywhere with different input options like S-Video, composite, or VGA, so you can connect a PC, VCR, satellite box, DVD player, or game console. One thing to look for in these panels is the response time, usually measured in milliseconds ("ms"). A decent LCD has around 30-40ms response; much higher than that and a movie with a lot of action can look jerky.
Resolution matters too, and bigger is always better. I'd suggest at least 1024×768, and I wouldn't go below 640×480. Some panels out there are as low as 320×234, and those won't look good at all. Imagine an image 8 feet wide by 6 feet tall made of pixels that size; each one would be about a third of an inch tall, which creates an effect called "screen door," like looking through a screen door with lots of little black lines everywhere.
There's also the contrast ratio, which determines how dark black looks when projected. Store-bought projectors can hit up to 3000:1, which is very high; it means that if the LCD is totally black, no light hits the screen. Most normal LCDs are around 150:1 to 500:1; again, higher is better, and I'd suggest going no lower than 300:1 or your blacks start looking like dark blue.
The last thing with LCDs is a trial-and-error step: a projector needs a very bright light shining through the LCD, so you have to take the panel apart and remove the old backlight and its cover so a new light source can shine right through it. Not all LCDs will cooperate. Some can't be taken apart easily, and if you're not careful you can tear one of the ribbon cables, which are almost impossible to replace or repair.
The simplest and most popular option is what's called a projection panel. You've probably seen these used in schools, set on top of an overhead projector to make a big TV. These show up all over eBay and surplus sites, but do your research first and make sure the specs are in an acceptable range. If you've got a big wallet, you can buy real 0.7″ projection LCDs with custom driver boards for around $3000. These work great, but as you'd expect, quality comes with a big price tag.
Light Source
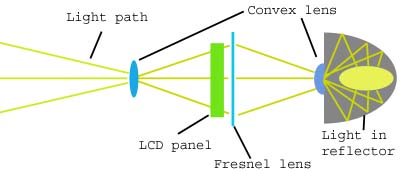
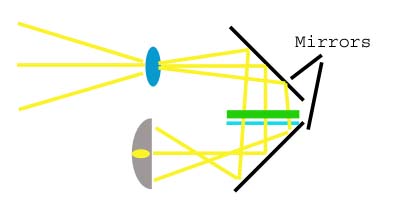
It takes a lot of light to make a bright projected image. I'd guess about 60-75% of the light gets blocked by the polarizers in the LCD, so you want somewhere around 50,000 lumens going into the screen to get a bright picture. The tricky part: if you get a 400W metal halide bulb rated at 50,000 lumens and just set it behind the screen, the actual light making it through the LCD is only about 5-10% of the rated lumens, because the light is scattering in every direction. You need a way to direct all that light through the LCD, and that's done with a reflector. This is another trial-and-error step, since not every reflector shape works well. The best type of bulb to use is a metal halide. These come in all kinds of shapes and sizes, and you can check the GE or Sylvania websites to see what would work for you.
Lenses
Sitting behind the LCD is a lens called a Fresnel lens, used to converge the light onto the projection lens. It's important to get one with the same focal length as your projection lens, so it focuses most of the light onto it correctly. The wrong focal length could let through only half the light and make your image half as dark as it should be.
The final and most important part is the projection lens itself. The best ones to use are triplet lenses, three lenses in one casing, which make it much easier to focus the image. If you use a regular convex lens, focusing the center of the image will leave the outside edges blurry, since they're a little further from the lens. A triplet lens fixes this, so the outside edges stay in focus along with the center.
This next step is also trial and error. There are calculators you can use, but it's hard to get an accurate measurement. The magnification (or focal length) of the lens determines how big your projected image is. Say your projector is 10 feet from the screen and you have a 200mm lens, that makes the image about 8 feet wide, and a 400mm lens at the same distance makes it about 6 feet wide (these aren't precise measurements, just a feel for the relationship). LCD size is a factor too. A 10″ LCD with a 300mm lens 10 feet from the screen might give an 8-foot-wide image, while a 1″ LCD with that same lens and distance might only give you a 3-foot-wide image. There are so many variables that it's genuinely hard to say exactly what you'll need. An easy way in is to buy a set of about 10 convex lenses ranging from 200mm to 600mm and try them out to see what size you need. You can get these cheap from places like surplus optics sellers online.
I hope this got the ball rolling for you. I'm no expert in this field, so I can't give a great answer to most of the tougher questions I've gotten, but this should give you the basic idea. It takes a lot of trial and error. I've tried all kinds of things to make my own projector better, and I've been on the lookout for a cheap, small LCD source and a small light source. When I find something reliable, I'll post it here.